Sunday, November 16, 2008
CRAFTING BLOG NO MORE!
Because i seem to be neglecting my blog, i have decided to use it for a book i am writing. Its written in a diary type format. The name of the girl telling the story is named Lilly, She is a 15 year old girl who cuts her self. Currently the story starts out with her in a mental ward. There is a boy she likes and she feels that she will never get the chance to be with him. But this will turn for the better once she leaves. I haven't gotten much, but i think its going good so far. For every chapter (diary post in this case)i will post it to the blog so everyone can get an upfront preview of it. I'm not sure if i plan to have it published, but i feel its a little personal, with a few minor changes. So far i have 3, and i will put them up in one post. The next one will be separate. Anyways, sorry for the inconvenience and i hope you keep checking out my blog.
Monday, October 20, 2008
Halloween Creations
This year for my Halloween costume im going for a gothic lolita kinda look. And what better way to perfect the look by making your very own mini top hat. I wish i had my own how to, but i followed instructions used at this site HERE. I did not use the same concepts in making mine. Mine is made a little different from the one shown in the tutorial. How is it different? Mine is no-sew. So, i hope you enjoy what i have to show you and i hope you have fun making yours as well.


Saturday, October 11, 2008
October Costumes
Having a hard time looking for the perfect costume but not sure what you want to be. Everything is simple, for example. To day i'm going to tell you how you can make your very own skeleton costume.
This you will need
1. Black Long Sleeve Shirt/ or plain black hoodie
2. Long Black Sweat Pants
3. White fabric paint/ or UV reactive fabric paint.
4. Picture of A Skeleton
5. Black Knitted gloves
6. Face Paint and Make Up Brushes
Lay out your black shirt. Look at your picture and study it. If it helps to see what you want. You can draw it out on a piece of paper. Now that you have studied your picture and know exactly how you want it to look. Begin painting the front part of the skeleton on your black shirt.Once you are done with that. You are ready to move onto the pants. Do the same for this as you did with the shirt. So your skeleton will have legs.
Extra tip: If your crafty with a sewing machine, you can create shoe covers to make the feet.
Next take your gloves and pain hands on them. When you have completed this. Put your costume on and paint your face like a skeleton face. Now your ready to rec havoc on your neighbor hood. :D
Tuesday, October 7, 2008
IMVU Credits free, Can this be?
As most of you mite know already, that Metarl, a site for credits, its the most talked about site on the net today. Not only can you get credits for imvu, but you can also get them for Second Life, Entropia, There, Habbo Hotel, and GaiaOnline. It's simple stuff. Just go to Metarl.com and sign up. Once you have signed up, your ready to partake in the credit earning experience. You can complete tasks, free offers(i hate these), or you can play games. There is also a raffel that you can enter for free once everyday. And, if your good at getting meta points, you can get a free avatar name registration. Its a a lot to do, but hey. You get free credits out of it. So go to Metarl, sign up, and start earning metapoints.

Thursday, October 2, 2008
Sorry For The Mix Up
Im going to start posting stuff for October next week. Sorry for any inconvenience.
Thursday, September 25, 2008
New Feture
Join my mail list and be the first to know when a new blog has been posted. Post your email address in the comments or you can email it to be at jc_cj_jackel@hotmail.com. Dont miss out on the exciting news for Next month. So don't be lame, join the mailing list and get your creativity on.
Wednesday, September 24, 2008
DIY bag
Hey guys. I know i said that i was going to be posting items that i have made, but i have neglected to post much of anything. Anyways, i finally got a digital camera that i can use at my own expense instead of using my mons camera. This is a bag that i made over the summer, and its not of the best quality but its till pretty awesome. Its the first thing that i have ever sewn and i'm really happy with the way it turned out.
So this here is my bag that i have made out of black and purple velvet, safety pins, and a guitar strap. I' m very pleased with the way it turned out and i love it. I know i said this several times already. But its a really good job for being my first sewn item.
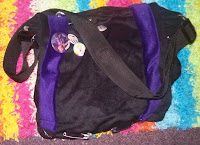
My first bag i made over the summer.
Tuesday, September 23, 2008
IMVU avatar photos

Over time i have been developing imvu avatar photos from basic imvu avatar screen shots. I have gotten a lot of request to share this information and i felt that it is time that i do so.
What is a screen shot? A screen shot is the current view of your monitors screen. It takes a photo of everything that is in view including the task bars, start menu, and any other programs that are open down bellow.
Screen shot tip. If you have several items open and you want a screen shot of a specific item. Make sure the target is above everything else. So that when you take you screen shot you don't have clips of other programs in your photo. Don't worry, you can cut out the parts you don't want. You will read how to do this in the tutorial.
Items you will need.
IMVU 3d chat
Normal Windows Paint Program
Paint Shop Pro (sorry, i do not use photo shop.)
Internet connection
Your best imvu avatar screen shots
Some extra time-time variation-depending on how skilled you are, one photo should take a maximum of 30 minutes. An hour at the most for thoughs who are little lest skilled than others.
1. Open your imvu and log in if you have not done this already.
2. When you have completed this step, you want to set your status in DND(do not disturb) mode. Make sure you set back to available when you are done (optional.)
3. Click on the "My Room" icon in the buddy's window at the bottom. Once your window is open check to make sure that your graphics are running smoothly. If they have a block like texture you want to change that to Accelerated graphics (Open GL or Direct 3D), and when you have done this close the window and reopen it to refresh the graphics settings. Now your avatar should have a smooth texture.
4. Click on the inventory tab in the buddy's window and scroll down till you find the tab "Rooms & Furniture." Once you have opened this click on "Rooms" and find the "Bionic White Room" and click on it.
5. Now that you are in the white room. Its time to customize your avatar. If you have poses this will make the photo exponentially better. Now that you have your avatar the way you want him/her to look. Size your photo. Meaning you can Zoom in, Zoom out, take aerial view, side view, and any other view you can think off. Once you are satisfied with said view. Take a screen shot. How to take a screen shot. On your key board hold down Ctrl+Print Sc. The Print Sc button is under the insert button. -----Oh btw... i would, really, really, really, suggest that your avatar not be wearing white. Why, because when you do background erase. It will erase you avatar as well, because the clothing sometimes blends into the background that the program thinks it is part of the background. Making your avatars leg, or arm, or shoe erase. It is fixable, but if this is your first time doing something like this. I recommend you stay away from white clothes till you get more experienced. Pixels are a hard thing to work with when you have to do it one by one instead of doing a billion with one click. Plus the color variations are noticeable when you zoom out if they are not blended properly.
(I'm sorry that the video is not the best. I was using my digital camera to make it. But i'm sure the video can give you some kinda of an idea on how to take screen shots from different view points.)
6. Wallah. You have now taken a photo of your current screen. Now this is where this start to get fun (not really.) Open the windows paint program and when you have done this. You want to hit Ctrl+V to paste you screen shot. Now you have your photo pasted, you want to crop the image. Cut away all the extra parts you don't want in your photo. Now you have done this, your going to want make your canvas fit to size of your photo. Meaning, move your photo to the top left hand corner of the paint program and take away the extra white part of it. When you are done cropping the image. Save the photo in your photos. It helps to have a fold just for these. I usually name min IMVUpix. This makes for a nice and simple way to find your photos.
If there is no scroll bar to the right of the image window. You can skip this step and move to Step 8.
7. Okay, here is the fun part now. Now that your ready to get your hands dirty. Open your paint shop program. If your computer runs slow, it mite be a good idea to close all unnecessary programs. Now that you have done what you need to do to get ready. At the top left hand corner, there will be an icon with a folder that has an arrow above it. Click on the icon to access your files. Open your imvu folder and choose the photo you want to work on. If you image is to big, meaning that there is a scroll bar on the right side of image window. Zoom out until that scroll bar disapper. Now take a screen shot of the page. When you have your screen shot hit Ctrl+V to paste. On the left side there is a Tools bar. Look for a box type icon with a line going through it. When you hover over it there should be a drop down box that says "Crop Tool (R)" and click on this tool. Select your photo and the photo only. When you are done dubble click to bring the picture to full size. Now you are ready to go.
8. In the Tools bar on the left there will be an icon with a pencil that looks like it is erasing something. There is an arrow next to it. Click on that arrow and then click background eraser. Now, at the top there will be a tool bar for the eraser. There are a few things you need to do before you start erase. Make sure you Hardness, Density, Thickness, Opacity, and Sharpness are all set to 100. Your Step should be set to 1. Rotation set to 0. Sampling and limits should both be set to contiguous. Last make sure you have check marked the box Auto Tolerance and nothing else.
9. When you have everything set to the proper settings you are ready to erase. When erasing you only want to erase the white only. When you have everything erased that is in plain veiw. You need to zoom in on the hair and find any white spots that you think need to be erased.
Sizing.
When erasing large areas of white you want to make your eraser bigger. When erasing small areas of white you want to make your eraser smaller. Simple stuff if you ask me.
(Fonts- Before moving on to Step 10, you can download fonts that you want to use for your text when you have finished erasing.)
10. Your done! Lets hope if your on this step. Now, its time to add text. Think of something catchy to put for text. Maybe your avatar name if you cant decide what to put. Anyways, to add text you first need to click on the A on the tool bar to the left. Setting-Create as should be set to vector. This will let you size and move your text. The other options are not as good as this one. Font can be anything you want, same with size. Your Strokes with pixels should be set to 0.0 or 0.1 unless you want the font to be thick. Anti-Alias should already be selected. Alignment does not mater if you use the vector setting. Everything else should be automatically set correctly.
11. Changing the hue(color) is simple. On the color pallet to the right there are 2 boxes. More than likely the top on should be black for you outline color. The second on can be any color you wish, or you can make it transparent by clicking on the circle with the line going through it. Once you are happy with your color selection and font you can now add personal text. Click anywhere in the image window. A box should appear. In that box, type the text that you want to add. If you find that you have found something wrong with the photo and need to go back, (Go back-meaning you have to change something to the photo, because when you apply text it goes onto a new layer) check the box that says remember text. This will remember your text so you don't have to type it again. But if you delete it and type something else and find you don't like it and want to go back. You have to retype it if you clicked the apply option. When you are peachy with your text click the apply button. There will be a circle thing in the middle. This will allow you to move your text. On all sides and corners of your text there will be small boxes. This will allow you to re-size you photo.
12. YAY TEXT! Now you have your text, your image is looking good, and your happy. Its time for shadowing but, first you need to open the picture in your internet browser and save the photo. This will put both the image and the text on the same layer. To open your image in the internet browser you need to go to the top and click view. Scroll down the drop menu and click the "Preview in Internet Browser" option. Now there should be a window that says "Web browser, image formats, blah. blah..." Choose the "IEXPLORER.EXE option. If you do not see this go to edit web browsers, click on add, and type it in. If you want you can browse for the option or you can enter it manually. Submit it as IEXPLORER.EVE and click ok. Once it is added click okay again. Now you have it added. Choose the IE option only. If something else is highlighted in gray under the browser click on it. This will un-highlight that browser. Under image format click png and un-highlight jpg.Why PNG? PNG files keep the background transparent when opened in a web browser. This also has a smaller file mass than a jpg or gif file. When you are done click preview, this should go to another window. Under the colors tap select the option 16.7 million colors (24 bit). In the next tab select Alpha channel transparency and Existing image or layer transparency. When you are done click OK. A window should show up, allowing you to view your picture. If there is now white around you photo, you have done everything correctly. If there is a white background then you need to go back and check what you did. When the window has opened and loaded, save the image.
13. Go pack to paint shop and close any image windows that remain. You do not have to save unless you want to. BTW, the reason we open photos in IE, is because if you save it through paint shop, the format of you photo will change. It is very difficult to take away the white background when you have saved it, if you have shadow behind your photo. Plus you can not upload photos to your myspace, myyearbook, or any image hosting web sites. Now, reopen the preview file you saved when you opened the photo in the browser. Now you ready to add shadowing. If you don not see a teel box with shadow behind it anywhere on the tool bars you need to open this. Right Click anywhere on the gray at the top where the file, view, image, ect are at. Hover over tools and when the drop menu appears click the effects button. This should open all your effects options. Find the teel box with shadowing and click on it. Now a window should open. where is says off set make both options 0. Under Attributes make the opacity 100 and the blur 18.00 and remember. The are the options i go by. Feel free to chose you own. Now click on the color box and pic a color you want for your photo's shadow drop. When you are complete click okay. Make sure you do not have the "Shadow On New Layer" options selected. Now you have shadow. To make the shadow darker. Click on the shadow tool, when the window opens click okay. Now you have darkened your shadow a little more.When you have completed this. Open your image in the web browser the same way we did before. When it has open and loaded, you can save it and share your creation with the world.
YOUR DONE!!! AWESOME JOB!...lol
Remember, any questions/concernse-email me at jc_cj_jackel@hotmail.com or leave a comment. If you have any suggestions feel free to email them aswell.
For a little more advanced editing. Ask me. What i mean by this is that, ill show you how to add a background to your image and how to make it fade to transparent background.
Sunday, September 21, 2008
Where do all the balloons go?
Deifying the laws of physics is a fascinating expression of great talent and understanding of are known world. I know this has nothing to do with diy, but i thought it would be an excellent idea to show you a short cartoon that does just that. In the short cartoon, it is based on a child's wondering mind of where balloons go when they are lost. It indefinitely deify's the laws of physics, but a child's mind can not fathom these laws when they are at such a young and tender age. Follow the underlined link listed bellow and enjoy the cartoon. The name of said cartoon is "Where Do All-The-Balloons-Go?"
Where Do All The Balloons Go?
Where Do All The Balloons Go?
Monday, September 1, 2008
Steampunk
So, as most of you know by now, im sure, that threadbangers is having there steam punk week. Well, i can tell you that i have most defiantly see it and im liking what i see. The goggles from the first episode are so cool and i plan to make some when i get the time (actually its when i get all the materials then when i get the time). So after rummaging through the inter-web i found amazing sighs for some awesome steampunk how too's, blogs, and other amazing steampunk finds.
www.streettech.com explores the mind of one man who helps organizing fares and other such things. Explore and learn.
Of course we all know etsy has some amazingly awesome items. Check out sewlutionsbyamo's etsy shop for some wicked leather accessories.
When your done looking around those sites head over to www.steampunkworkshop.com for some amazing creations by Jake Von Saltt.
Looking for some Steampunk music. Well check out Abney Park over at www.youtube.com and head over the official www.abneypark.com web site for more info on the band.
Remember, threadbangers is hosting there steampunk week, so make sure you check it out.
If you find any sites that are appealing to you. Leave the links in a comment and ill get them posted.
Thursday, August 28, 2008
Holidays
Okay, so as you know the holidays are coming around and its time to start preparing to the fun festivity's. Well, i know its a little early to start preparing for some but to others, early is not in there vocabulary. So all through-out September and October, every week i will post new ideas to welcome fall and Halloween. Well, more along the lines of fall for September, but when October comes around there will be lots of fun ideas you can do. There will even be a few tutorials for costume ideas, and awesome food recipes. So, check back every week in September and October for new ideas. anyways, todays quick tip.
If your between the ages of 13 and 17, then this is just for you. If you know that you have parents who are strict about how your room looks. Then make minor tweaks to make it one of a kind.
Tip #1
If your bed is looking a little bland and you want to make it look a little better. Then this idea is for you.
Get a hula-hoop a few yards of fabric and some ribbon.
Cut 2 35" pieces of ribbon. (I almost forgot. If you don't like the color of the hula-hoop, get some black spray pain and spray it.) Lay the ribbon in a plus pattern so you have for sections. Now tie the ends to the hula-hoop. This will attach the hula-hoop the the celling. Now take you fabric and lay it on top of the hula-hoop. Mess around with the fabric to make it the way you want it. Hold it up just to get an idea of what it is going to look like. If you are satisfied with it. Take a push pin and stick it through the part were the ribbon crosses each other and stick it in the celling above your bed. Now you have your very own custom mad canopy bed.
Tip #2
If your walls are white and it just is not flowing with your tang. Measure the width and length of the wall. Cut some fabric accordingly and tack it on your wall. Now you have a splash of color. If you want. You can do this to all four walls.
Tip #3
If you have a lot of posters laying around and your parents don't want you putting holes all over the wall. Well, convince your mom or dad to let you put a few pins in the wall. You will find out later why you have to turn on your kiddish charm on your parents. Lay your posters out on the floor and arrange them the way you want. Take some tape and tap the together creating on big poster. Now you only have to put 4 pins in the wall instead of a bazillion pins.
Tip #4
Convince your parents to put shelfs up on your wall and get some antique treasures and put them on your shelfs. This adds for a classic look and makes your room seem not so bland.
So get to crafting and remember. Don't buy pre-made, buy handmade.
Monday, August 11, 2008
Trash to Treasure

 My mom has always asked me if i was ever going to be a pack rat like her grandma. I never really gave her a straight answer, but awhile back i started to collect pop tabs. My mom asked me what i was going to do with said pop tabs and i said i don't know. Well finally, i found this awesome idea and i said "see, i told you they would be useful" or something along thought lines. So over time i have been doing a lot of research on diy projects. While i was on my quest for tutorials on handmade items, i stumbled across a website called www.cutoutandkeep.net and found some neat stuff. Well i found a tutorial on how to make a bracelet out of pop tabs and elastic cord. (sorry the image is not that great). Anyways, this is my newest creation and i absolutely love it. I barely had enough to finish this one, but ill tell you it will not stop me from making more. So, if you want to find out how to make your own go to the site i listed before and get to making. There are a lot of other great projects there as well and each one is a marvel. Enjoy
Friday, August 1, 2008
Shoes!!!
Ok, so i recently came up with a totally awesome idea to redesign your shoes and make them one of a kind. If you have the money you can go to www.converse.com and get custom shoes created in any color that you want. Well when i was thinking about stuff one day i came up with the idea to make jokers card shoes (jokers cards-the 6 albums of the insane clown posse) for those of you who don't know who they are. Anyways here is my awesome idea.
Tip #1
Get some shoes
Tip #2
If you have plain white converse get some fabric paint, or spray paint and start tagging up.
Tip #3
For those of you who have the money go and create some awesome colored shoes. They even let you put your own personalized text on them, but the down fall is that you are limited to a number of characters which sucks horribly
Tip #4
If you have patches sew or iron them on.
Any other ideas to deck out your awesome shoes feel free to leave a comment.
Thursday, July 24, 2008
Sorry
Hey guys, sorry i haven't posted anything new. I haven't had the time lately to put anything new up. Iv been so busy doing stuff and i forgot about the blog. I'm trying to get ready for school cuz i start next month, yay. I haven't been doing to well with school the last few years so i'm excited to get back to it. Anyways, here is a pre-preparation tip for school.
So you got the new back-pack you have been wanting to start the new year out with, but find that its just a tad bit plain and want to spruce it up a bit. Well here's a tip that will help you do just that.
Tip #1
Dig up some money and go buy patches. Patches are a fun way to add your own flavor to any garment or bag. Make it your own with your fave band logos, pictures, anything.
Tip #2
Take some sand paper or a cheese grater and tater up around the bag. This adds for a great vintage, worn out look. Also, if you have one. Take a dremel and start to make holes in it. Take and old piece of fabric of your choice. Put it behind the hole and sew around the hole to keep the fabric in place for some added flair or you can simply leave it as is. No matter how you do it, it will look good no matter what.
Tip #3
Make a stencil from your favorite picture and paint it on with some fabric paint, or spray paint. Or you can just splatter the paint on for a fun and scattered look.
Tip #4
Don't worry about mess ups. Honestly, i don't think you can mess this up unless your just that skilled. Any mess up will add a personal stamp on any bag. So even if you think you did something wrong, don't sweat it because it makes it all that much better.
Got any other cool ideas to make your bag one of a kind try it. Make it yours, and have fun doing it.
Commemoration of 2007-2008 Seniors of Brighton High School and other Schools. Have fun at College.
So you got the new back-pack you have been wanting to start the new year out with, but find that its just a tad bit plain and want to spruce it up a bit. Well here's a tip that will help you do just that.
Tip #1
Dig up some money and go buy patches. Patches are a fun way to add your own flavor to any garment or bag. Make it your own with your fave band logos, pictures, anything.
Tip #2
Take some sand paper or a cheese grater and tater up around the bag. This adds for a great vintage, worn out look. Also, if you have one. Take a dremel and start to make holes in it. Take and old piece of fabric of your choice. Put it behind the hole and sew around the hole to keep the fabric in place for some added flair or you can simply leave it as is. No matter how you do it, it will look good no matter what.
Tip #3
Make a stencil from your favorite picture and paint it on with some fabric paint, or spray paint. Or you can just splatter the paint on for a fun and scattered look.
Tip #4
Don't worry about mess ups. Honestly, i don't think you can mess this up unless your just that skilled. Any mess up will add a personal stamp on any bag. So even if you think you did something wrong, don't sweat it because it makes it all that much better.
Got any other cool ideas to make your bag one of a kind try it. Make it yours, and have fun doing it.
Tuesday, July 8, 2008
Duck Tape
 Ok, I probably know what your thinking. Duck tape, what can duck tape do for me? Well in fact it can do alot for you. Not only can you use it to repair your car, but you can also make clothing out of the stuff. What, Clothing. You got to be kidding me? Well im not. Duck tape is awsome if your committed to hours of labor just to make a single t-shirt. Not only can you make clothes you can also make awsome hand-bags, roses, tote bags, even hats and so much more. Head over to www.ducttapefashion.com/ or www.stuckatprom.com and see some of the awsome things that can be made and you can even buy stuff from www.ducttapefashion.com/. So, you only though duck tape came in silver did you? Wrong, duck tape comes in a variety of colors from solids, to fluorescents, to camouflage. Also at duck tape fashions you can pic up "DUCTIGAMI: The art of the Tape" book and learn the tricks behind the tape. Who knew duck tape could be so fun?
Monday, July 7, 2008
I CAN'T SEW!!!
Have you ever wanted to transform your old clothes into todays hottest fashions, but have no clue how to run a sewing machine? Well, there is no need to worry anymore. There are hundreds of thousands of ideas that only takes a few minutes to create with just a pair of scissors, safety pins, and more. So, head over to Google and type in non-sew diy projects and let the creativity flow. If you would like to learn to sew, there are plenty of classes that you can take even as an adult. From beginner to novice you can learn to create it all. With just a few tips from prose you can learn to sew any way you want. Even learn how to embroider with the magic of a stippling tool on the normal sewing machine. Thread bangers offers many ways to create your own style and make it look good. So don't be the loser wearing the store bot clothes, be the the master of fashion with your own unique clothing.
Heres another easy tip. Learn to accessorize. When your go to a thrift shop, you know right off that everything there is different. So let your imagination run wild. If you don't know how to sew then throw things together. Good thrifting takes time and often trips to the thrift store. So if your looking for something but can't find it, got another day and it may be there. Ebay is a good start for anyone who does not enjoy going out often and most times you can find what you are looking for.
So search, learn, and create. Make your style your own.
Tuesday, June 24, 2008
Book Review
 "Generation T: 108 Ways To Transform a T-Shirt" by Megan Nicolay. This inspirational guide with DIY attitude has everything you need to know about the world’s great T-shirt: how to cut it, sew it, deconstruct it, reconstruct it, and best of all, transform it. MAKE IT YOUR OWN!!! Not good on the machine, no worries. More than 1/3 are no sew projects, meaning anyone who can wield a pair of scissors can put a personal stamp on there wardrobe. You can also learn to customized tees, tank tops, tube tops, T-skirts—even handbags, a patchwork blanket, iPod cozies, leg warmers, and more. So its not what your T-Shirt can do for you, its what you can do for your T-Shirt. You can find this book on Amazon or anywhere else on the internet for the low price of $10 depending on were you shop for it. So, buy it, learn it, create it, wear it. Don't wear someone else's design. Wear your own and be different from everyone else. Here is a spacial episode of threadbangers that host a short clip of Megan Nicolay herself. Also in this episode you can learn to make an awsome swim suite out of your old T-Shirts, and be sure to head over to www.threadbangers.com and check out the the blog, forums, and episodes of past shows. So let the video roll.
Yarn falls...
Ok so quite sometime now i have gotten thousands of compliments on my yarn falls. People thing that they cant make these because they think there to expensive, they don't have the time, or they can't do them on there own. I find them to be the most easy and inexpensive hair fall there is.
Yarn falls and other types of hair falls are a fun way to spice up your wardrobe and to stand out in the crowd. There are many different type of hair falls that you can buy or even make yourself. They come in all verities of falls like cyberlox, dread falls, pvc falls, and many more. Yarn falls are probably the cheapest hair falls you can make because they are simple, cheap, and look great for anything. You can find supplies just about anywhere you look. Earlier i was looking about and i found a great website called [url]http://www.ikickshins.net[/url]. This sight host just about everything you need to make hair falls and the best part is that there cheap. I recommend that if you decide to make dread falls that you buy the synthetic hair and dread them yourself because predreaded hair is expensive.
Supplies
1. Yarn of any color
2. Scissors
3. 8 Hair Ties
4. Bobbie pins
5. Rexlace (optional)
6. Pieces of cloth (also optional)
How to make them.
Ok, first you should start of by cutting your yarn. Make sure you cut the yarn twice the length you want it to be, because when you fold the yarn in half its going to be shorter than you cut it. Also make sure your Yarn is in a bulk. It must be enough to cover your existing hair. You can have as much yarn in each one as you like depending on how thick your hair is. So, once you have your yarn cut. Make sure you mix up the colors of yarn.Now take one hair tie and tie it to tie it around the yarn (like you tie your hair in a pony tail). Make sure the tie is in the middle. Once you have completed this step. Take a second hire tie and tie it to the existing tie you have on already. This one will tie the falls to your hair. Once you are done with the first fall, repeat the steps as followed for the second one. When you have completed your second fall your done. Simple as 1,2,3. This make take 1 to 2 hours depending on the length and thickness of your falls.
Extra tips.
1. Once you have cut all your yarn. Feel free to add in Strips of fabric, sequence, etc... to maximize the possibilities.
2. If you do not like then ends of your falls to be different lengths. You can cut them to make them even at the bottem.
Putting them in.
Ok, now your ready to put in your falls. First split your hair all the way down the center of your hear. Make them into pig tails. Try to make them as even as possible. Next take one of your falls and put your figures through the existing hair tie on the falls. Make sure the yarn is laying on your head when your putting them in. If you do this the yarn will cover the hair tie you had in first. Once you have put in the falls, take another hair tie and tie it in again. This will keep the falls from slipping out. For best support i suggest putting your hair in a bun. Now take some bobbie pins and anchor the falls to your hear. This will keep your existing hair from slipping through the yarn. Complete the same steps for the second one. Once you have both falls in your ready to go. If you do not wish to have your falls in pigtails you can make it a ponytail. Just pull your hair back, tie it up and put in the falls like you would with the pigtails. Simple as can be, and fun to have. Hope you enjoy making falls and i hope this piece of info helped you be different.
If you decide to add Rexlace(plastic string) to your falls or even cloth pieces then fallow the steps show for the falls.
Also if you feel that you are complete with your falls, but still want to add to them. Just lace anything you have to add through the hair tire binging the yarn.
Any questions? Feel free to message me at [email]jc_cj_jackel@hotmail.com[/email] or [email]juggalettesjoker@yahoo.com[/email]. (note. i check msn for than yahoo.)
These are the first yarn falls i have ever made. I had trouble making them the first time but once i figured it out i was happy to have a new and unique look that i can have fun with.
ThreadBangers: How to Turn a T-Shirt Into a T-Skirt
Its pretty self explanatory. Just fallow the video and you can have a new skirt in no time.
Monday, June 23, 2008
So you want to learn to sew?
So, you want to learn to sew? Well there are hundreds of thousands of sites that teach you how to sew. From videos on youtube to step by step instructions on the web. Google host thousands of sites that can be viewed at your own expense. Gothic fashion is something i have been into for a long long time now. I haven't really gotten into much of anything else, but there are hundreds of resources that can apply to any type of style clothing that you are most interested in. From gothic grunge to high class fashion. You can do it!!! My recent find was a sight called www.threadbangers.com (diy fashion site). This site has forums, blogs, videos, and much more. I would recommend this site to anyone. Why? Because thread bangers host an array of different ideas for any DIY junkie. Also threadbangers host different events that you can go to. Many of which take place in Manhattan, NY. So next time your passing through NY around the time of the DIY festivity's, take a day and go see whats up. Maybe support the local DIY'ers and purchase some items. Most of the time some of the proceeds go to a good cause. So not are you only helping out local businesses your also helping charity as well.
~Jezabeth~
~Jezabeth~
Saturday, June 21, 2008
Fantastic DIY sites
I had recently found some amazing sites that host many different ideas for items that can be created in your own home and gives you awsome ideas, tips, and tricks.
These are the top 5 sites.
1. www.threadbangers.com you can also find them on www.youtube.com
2. www.ikickshins.com this site is for cybergoth hair fall supplies and they also offer a small array of clothing.
3. www.ebay.com of course. eBay offers a wide verity of hand made items at a low cost.
4. http://gothfashion.info/corp.php this site offers easy step by step instructions to create a dark wardrobe.
5. http://www.geocities.com/diycat/ This site gives you awsome ideas from redecorating your bedroom to making a coffin purse/jewelry box.
There are many more sites out there that you can find. These are just some of the few that i find intresting.
DIY intro
Hey whats up and welcome to the new DIY(Do It Yourself) Projects blog on behalf of blogger. Here we will discuss new topics, hot ideas for clothing, sewing tips from other sites, other diy web sites, and much much more. Feel free to leave comments and visit anytime you want. Don't be afraid to ask for help with something. If you need more information you can contact me at jc_cj_jackel@hotmail.com or juggalettesjoker@yahoo.com. Peace
~Jezabeth~
~Jezabeth~
Subscribe to:
Posts (Atom)


